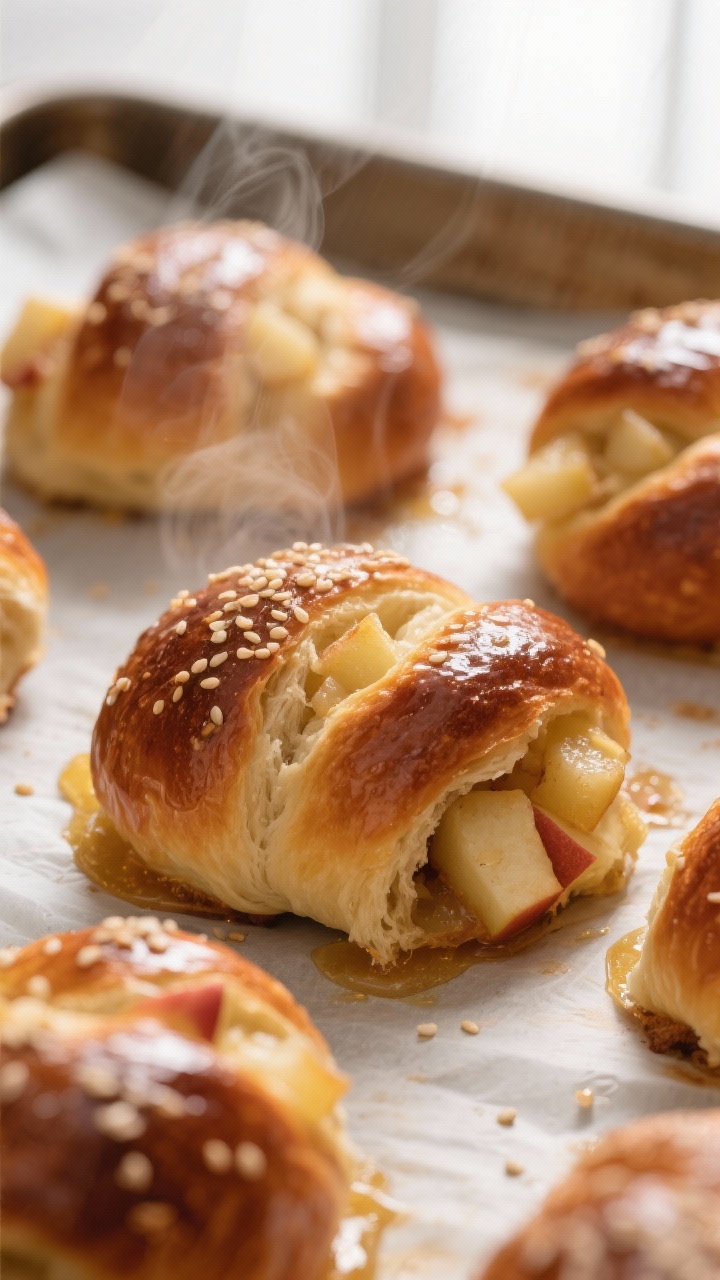
You don’t need a bakery diploma to pull off glossy, golden challah rolls that taste like a hug. Imagine warm, pull-apart rolls laced with soft apple bits and a whisper of honey—sweet enough for celebration, simple enough for Tuesday. This recipe is beginner-proof with pro-level payoff.
You’ll learn the exact texture to aim for, when to add the apples (without soggy chaos), and how to get that iconic lacquered crust. Ready to make your kitchen smell dangerously good?
What Makes This Recipe Awesome
- Beginner-friendly method: The dough is forgiving, the steps are clear, and you don’t need a stand mixer (though it helps).
- Balanced sweetness: Honey adds warmth without turning the rolls into dessert. The apples bring gentle acidity and juiciness.
- Soft, fluffy crumb: Oil-rich dough = tender rolls that stay fresh longer.
- Shiny bakery finish: A double egg wash gives you that photo-ready sheen.
- Perfect for holidays or brunch: Rosh Hashanah vibes, but also ideal with butter and coffee all year.
Ingredients
- Bread flour: 4 cups (520 g), plus extra for dusting
- Warm water: 3/4 cup (180 ml), about 105–110°F
- Whole milk (or more water): 1/2 cup (120 ml), lukewarm
- Instant or active dry yeast: 2 1/4 tsp (1 packet)
- Honey: 1/3 cup (110 g), plus extra for glaze
- Large eggs: 2 for dough + 1 for egg wash
- Neutral oil (canola or light olive): 1/4 cup (60 ml)
- Kosher salt: 1 1/4 tsp
- Ground cinnamon: 1/2 tsp (optional but highly recommended)
- Apples: 1 1/2 cups finely diced (about 2 medium; Honeycrisp, Gala, or Fuji)
- Lemon juice: 1 tsp (to toss with apples)
- Sugar: 1 tbsp (to toss with apples, optional)
- For finishing: 1 tbsp honey + 1 tsp warm water for a light gloss, flaky salt or sesame seeds (optional)
Step-by-Step Instructions

- Prep the apples: Peel (optional), core, and finely dice the apples into small cubes.
Toss with lemon juice and the 1 tbsp sugar if using. Set aside on a paper towel to wick moisture. Dry apples = fewer gummy pockets.
- Proof the yeast (if using active dry): In a bowl, mix warm water, 1 tsp honey, and yeast.
Let foam for 5–8 minutes. If using instant yeast, you can skip proofing and add it directly to the flour.
- Make the dough: In a large bowl, whisk milk, honey, oil, 2 eggs, and salt. Add yeast mixture (or instant yeast).
Stir in flour and cinnamon until a shaggy dough forms. It should be slightly tacky but not sticky-sticky.
- Knead: Turn onto a lightly floured surface and knead 8–10 minutes until smooth and elastic, or 6–7 minutes in a stand mixer on medium-low. If dough sticks, dust with 1–2 tbsp flour.
Don’t overdo it—soft dough = fluffy rolls.
- First rise: Place dough in a lightly oiled bowl, cover, and let rise in a warm spot until doubled, 60–90 minutes. If your kitchen is cold, the oven light trick works wonders.
- Fold in the apples: Gently deflate dough. Sprinkle the dried apple cubes over the dough and flatten into a rectangle.
Fold edges to center and knead 30–60 seconds just to distribute. You want pockets of apple, not apple mush.
- Shape the rolls: Divide dough into 12 equal pieces (about 90–95 g each). For classic rounds: tuck edges under to form a tight ball with a smooth top.
For mini knots: roll each piece into a rope and tie once, tucking ends under.
- Second rise: Arrange on a parchment-lined sheet, spaced 2 inches apart. Cover loosely and let puff until nearly doubled, 35–55 minutes. They should look pillowy and slowly spring back when poked.
- Egg wash, round one: Beat 1 egg with 1 tsp water.
Brush rolls gently, avoiding pools at the base. Sprinkle sesame seeds or a pinch of flaky salt if you like sweet-salty contrast.
- Bake: Preheat to 350°F (175°C). Bake 18–22 minutes until deep golden brown.
Rotate the pan halfway for even color. Internal temp should be about 190–195°F.
- Honey gloss: While warm, lightly brush with a mixture of 1 tbsp honey and 1 tsp warm water. This adds a soft sheen and subtle sweetness without making them sticky-finger disasters.
- Cool and serve: Let rest 15 minutes so the crumb sets.
Serve warm with butter, extra honey, or a schmear of cream cheese. Try not to eat three. No promises.
Storage Tips
- Room temp: Store in an airtight container for 2–3 days.
The honey helps them stay moist.
- Freeze: Wrap individually and freeze up to 2 months. Reheat at 300°F (150°C) for 8–10 minutes.
- Refresh: Day-old rolls love 5 minutes in a warm oven. A tiny swipe of butter before reheating?
Chef’s kiss.
- Avoid the fridge: It dries bread. If you must, wrap extra tight and plan to reheat.
Benefits of This Recipe
- Confidence-building: Teaches essential bread skills—kneading, proofing, shaping—in a low-risk format.
- Nutrient bump: Eggs and oil add richness; apples bring fiber and natural sweetness.
- Make-ahead friendly: Dough can be cold-proofed overnight for richer flavor and easier scheduling.
- Crowd-pleaser: Kid-friendly, brunch-approved, holiday-worthy. Basically, the Beyoncé of bread rolls.
Pitfalls to Watch Out For
- Too-wet apples: Excess moisture breaks the crumb.
Dice small and pat dry. Non-negotiable.
- Over-flouring: A stiff dough bakes up dense. Keep it soft and slightly tacky.
- Under-proofing: If they don’t rise enough, they’ll bake up tight.
Look for that puffy, slow spring-back.
- Skipping egg wash: That glossy finish? It’s the egg wash. Don’t skip unless you’re going vegan.
- Burning bottoms: Dark pans or low racks can scorch.
Use parchment and bake mid-rack; consider double-panning if your oven runs hot.
Variations You Can Try
- Raisin upgrade: Add 1/2 cup golden raisins soaked in warm water, then patted dry.
- Brown butter honey: Swap oil for cooled brown butter for nutty depth. Ridiculously good, FYI.
- Whole wheat twist: Use 1 cup whole wheat flour + 3 cups bread flour; add 1–2 tbsp extra water as needed.
- Spice lane: Add cardamom (1/4 tsp) with the cinnamon for bakery-level aroma.
- Maple finish: Brush with warm maple syrup instead of honey for a cozy fall vibe.
- Vegan route: Use plant milk, swap eggs with 3 tbsp aquafaba in dough, and brush with maple syrup + oil instead of egg wash.
FAQ
Can I make the dough ahead of time?
Yes. After the first rise, punch down, cover, and refrigerate up to 24 hours.
Bring to room temp, fold in apples, shape, and proceed with the second rise. Cold dough is easier to handle and tastes better, IMO.
What apples work best?
Firm, slightly sweet varieties like Honeycrisp, Fuji, or Gala hold their shape. Avoid mealy types—they turn mushy and wet the dough.
Do I need a stand mixer?
No.
Hand-kneading works perfectly. A mixer simply speeds it up and keeps your forearms from getting a surprise workout.
Why is my dough not rising?
Check yeast freshness, water temperature (aim for 105–110°F), and room temperature. If your kitchen is chilly, proof in an oven with the light on or near a warm appliance.
How do I know the rolls are baked through?
They’ll be deep golden with an internal temp of 190–195°F.
Without a thermometer, tap the bottom—hollow sound = done. Pale tops usually mean underbaked centers.
Can I braid these into mini challahs instead of rolls?
Absolutely. Divide each portion into three mini ropes, braid, and tuck ends under.
Keep an eye on bake time; smaller braids may finish a minute or two sooner.
Is the egg wash necessary if I’m brushing with honey after?
For that classic challah sheen and color, yes. The honey adds gloss and flavor, but the egg wash delivers the golden lacquer.
Can I reduce the honey in the dough?
You can cut to 1/4 cup without affecting texture. Any lower and you’ll lose some tenderness and flavor balance.
My Take
These Apples and Honey Challah Rolls hit the sweet spot—literally and figuratively.
They’re the kind of bake that makes beginners feel unstoppable and seasoned bakers feel smug. The method is straightforward, the flavor is layered (apple pockets + warm honey + soft crumb), and the payoff looks bakery-level with minimal stress. If you only bake one festive bread this season, make it this one—and stash a few in the freezer, because future-you will thank present-you.
Printable Recipe Card
Want just the essential recipe details without scrolling through the article? Get our printable recipe card with just the ingredients and instructions.